If you use Salesforce, you’re going to have to do a data import at some point. Whether it’s to import all of your historical data from an old system or to import a new list of leads, there’s really no getting around it. You’re going to have to figure out a way to get that data outside of Salesforce into Salesforce without entering it by hand.
There’s a lot to consider when importing your data into Salesforce, and it’s best to consider all your options before you pull the trigger on bringing hundreds or thousands of new records into your database.
Import Tools
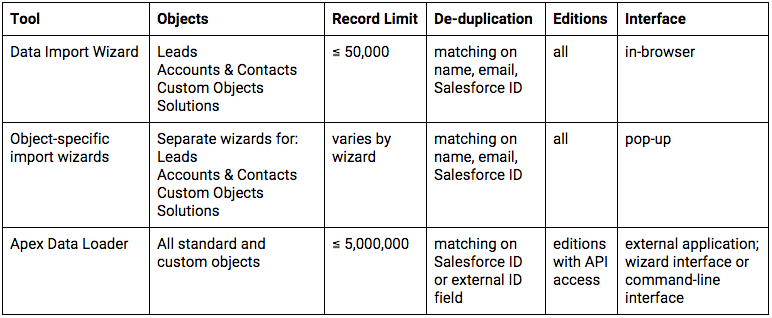
There are a number of tools you can use to import your data into Salesforce, with different considerations for each, such as which objects you can import and how many records you can insert, so here’s a side-by-side comparison of some of the main tools. Salesforce offers three main ways to import your data: the unified Data Import Wizard, the object-specific import wizards, and the Apex Data Loader.
When to Use a Data Import Wizard vs. Data Loader
Generally, the import wizard is a bit more intuitive and user-friendly. I would default to using that unless you need to load records into an object that isn’t yet supported by the import wizard (e.g., Opportunities), or you need to load more than 50,000 records at a time. The data loader is also limited in its ability to prevent duplicates, which can make it a bit risky to use unless you are updating existing Salesforce data using the Salesforce ID, or you know for certain you are entering entirely new data that would have no chance of already existing in the database.
Third-Party Salesforce Import Tools
There are a number of third-party tools available that can help with data import. Searching for “data import” in the AppExchange will return a number of tools. Some of them connect certain systems or apps to Salesforce, and some are general data loaders that are more robust than Salesforce’s native offerings. I’ll just touch on two tools that Newfangled has used for our import needs at various times: PeopleImport and Act-On.
PeopleImport is a Windows-based program offered by CRMFusion as part of their suite of de-duplication and data cleanliness tools. (We also use the other tools in the suite: DupeBlocker and DemandTools.) PeopleImport allows you to de-dupe against existing leads and contacts (using matching rules you define yourself), assign the list to a specific campaign and add new tasks. It’s a really nice tool, and I used it for a long time for all our data imports before we discovered Act-On.
The marketing automation platform Act-On can insert new leads and de-dupe against existing leads or contacts by matching on email address. This is what we use now to import attendee lists from conferences or events: We can add the contacts to Act-On and use the Act-On/Salesforce connector to sync them with Salesforce. We can also use this sync to add everyone in the list to a specific campaign.
Preparing for Your Import
In order to use any of the data import tools above, you’ll need a CSV file of your data. To prepare that file for final import, there are a few things to think about.
First, you need to fully understand what kind of data you have and how it corresponds to Salesforce objects and their fields. This is a very important step, and one that is often overlooked in the rush to get your data into the system. If you don’t think through the data you have and where it should end up in Salesforce before you import, you could end up with data in the wrong place or missing entirely.
Did you purchase a list of potential prospects? Those people should come in as Leads. Did you do an export of your current and past clients from your old system? You should bring in those companies and people as Accounts and Contacts.
Those are fairly simple import scenarios. Where it gets more complicated is when you have a list that’s a mix of different types of people. Let’s say your old CRM system only had one object to represent people and their companies, called “Contacts.” You can easily export a CSV of all your old system’s Contacts, but it’s a mix of prospect data and client data. Any prospects will require a Lead import. Any client companies and their employees will require an Accounts & Contacts import. You’ll need to split up your bigger list into smaller lists based on the corresponding objects in Salesforce.
Once you’ve determined what type of data you have and what objects it corresponds to, you should take inventory of the fields and column headers in your source data, and the fields available to you in Salesforce on the objects you’ll be importing data into.
If there are fields in your source data that don’t exist in Salesforce, you should decide if that data should come through. If it should, you’ll need to create custom fields to house that data. If you’re bringing in a list of leads and you end up creating any custom fields on the lead object, remember that you need to map your lead custom fields to corresponding custom fields on either the account, contact or opportunity object.
If you’re importing Accounts & Contacts together, think about whether there are certain fields that will need to map to both the account and contact record, such as address data.
You should also think about any fields that aren’t included in your source data, but should be populated with your import. For example, the Lead Status and Lead Source columns should probably be added to your source file if you’re importing Leads.
I suggest putting together a simple spreadsheet that lists your source data fields, the type of data and the corresponding Salesforce field(s). This allows you to quickly see which fields you may need to add or which fields you may not want to import at all. Here is an example of such a document.
Common Pitfalls
Data imports can be frustrating because you often run into errors stemming from requirements that aren’t clear from the specifications of the import tool or Salesforce. Below are just a few errors that I’ve run into before that you should watch out for.
1. State and Country Picklists
Salesforce recently introduced a change to their State and Country fields. Those fields used to be open text fields, but Salesforce now gives you the option of changing these fields to picklists. Newer orgs may already have State and Country picklists turned on, but if you’ve had your org for a while like we have, these fields still might be text areas. To see if you have picklists enabled, go to Setup > Administer Data Management > State and Country Picklists. You’ll see 5 steps required to enable picklists. Under Step 4, you’ll see one of two messages: “State and country picklists have already been enabled” or “Please complete Step 2 and Step 3 before enabling state and country picklists.”
If you’re importing state and country data into your org, you should know which type of field you’re dealing with. If you’re rolling with picklist fields, Salesforce will reject records if the State or Country values in your CSV do not exactly match the values in the Salesforce picklist.
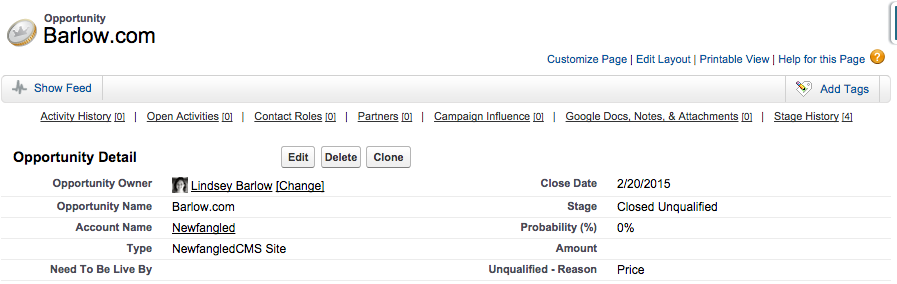
Say you’re trying to import Joe Smith’s data, and you have picklists enabled:

Do you know which values Salesforce is expecting for the state and country columns? Are the values in Joe’s record correct?
To find out, go to Setup > Administer Data Management > State and Country Picklists > Configure States and Countries.
Look at the values under the Country heading — those are the values you want to make sure your data matches. You can click Edit next to a country’s name to be taken to that country’s detail page, where you’ll see the values for States.
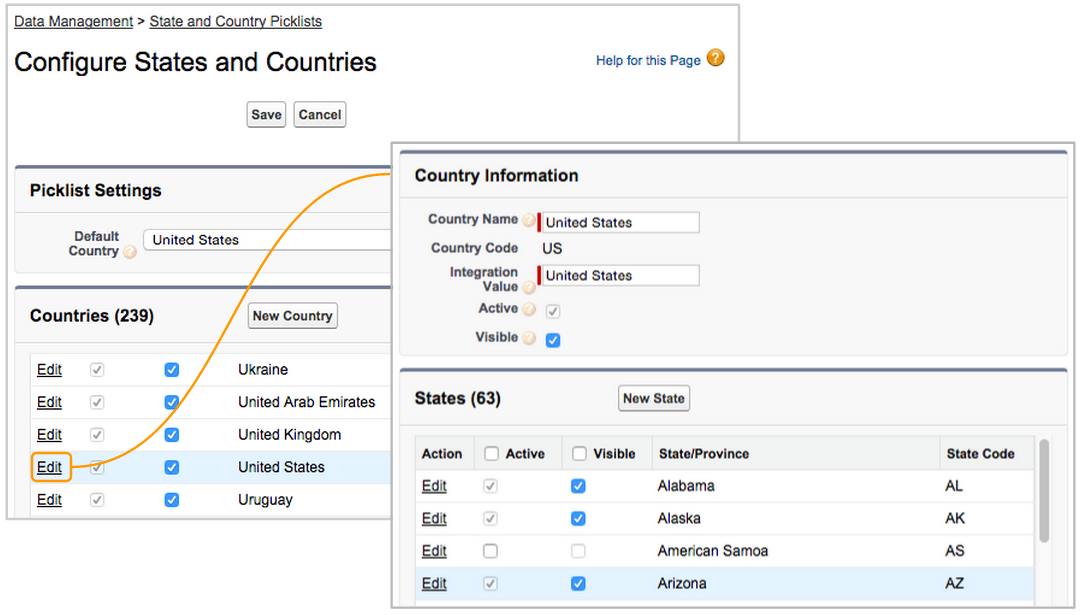
In looking at Joe Smith’s data, I notice two things I should change in my import file through find and replace so that I don’t get errors when importing:
- USA → United States
- AZ → Arizona
I could also change the values that Salesforce is expecting, and keep the values in my import file as is. Say for instance I am regularly pulling data from another system that has slightly different values for certain states and countries. I might change the values on Salesforce’s end to minimize the time it takes me to import and the chance of seeing errors.
2. Multiple Street Fields
The standard Address component in Salesforce is made up of a number of fields: Street, City, State, Zip/Postal Code, and Country. We talked about State and Country above, but there’s one last address consideration to take into account when importing. The Street field in Salesforce is actually made up of three lines: Street 1, Street 2, and Street 3. This may be called something different in your import data, e.g. Address 1, Address 2, Unit Number, PO Box, etc. Importing this kind of data into Salesforce can be a bit tricky, depending on the data tool you’re using.
If you’re using an object-specific import wizard, all three street fields will be available separately for you to map to. However, if you’re using the data import wizard or the data loader, there will only be one street field available for mapping. This requires you to format your import data so that your separate street columns are combined into one column, and the street lines in each cell are separated by carriage returns. See this help document for instructions on implementation.
3. Required Fields
Each Salesforce object has certain required fields and, depending on the import tool, if they are not included in your import file, your import will fail. I would recommend adding the following fields to your source data.
- Leads: Lead Status, Company, Last Name
- Contacts: Last Name, Account Name
- Accounts: Account Name
- Opportunities: Opportunity Name, Account Name, Stage, Amount, Close Date
4. Invalid Email Addresses
The import wizard will block any email addresses that are missing @ or .domain. E.g., johnsmith@agency will throw an error, while johnsmith@agency.com will come through just fine.
Test Import
Before you introduce a large number of records to your database, I recommend you do a small test import to make sure that your data is importing correctly. In putting together a set of sample data, try to do the following:
- Send data to each field. Each specific record doesn’t necessarily need to have data for every field (although that’s a bonus because it makes it easier to test your data submission), but you should be sending data to each field in your CSV so you can make sure it’s all mapping over correctly.
- Make sure the data is varied. Don’t send records that have the same values for the majority of fields. You’re trying to make sure you don’t have any errors in your data, and you probably won’t find any if you’re only testing a few values.
Naming Your Files
If you’re working on a large data import, it might take you days or weeks to get everything finely tuned and ready for your final import. You’re going to end up with a lot of test CSVs, and when you do the final imports, you’re probably going to end up doing more than one pass to correct any errors. I would highly recommend figuring out a descriptive naming convention for your CSV files so you’re never confused about which the files you should be working with. For example, the last large data import I did involved importing leads, accounts, contacts and opportunities. The client was uploading new files every couple of days as we worked through various issues with their data. I used the following convention when editing their source files for import: Object – description of the file – date.csv.
The Actual Import
Using each tool will be slightly different, but generally the steps for importing are:
- Choose the object you’ll be importing data into.
- Choose your matching convention to prevent duplicates.
- Choose your source file.
- Map your fields.
- Check your error logs.
- Spot-check your live data.
Regarding step 5: The data import wizard and the data loader should both produce a CSV with the results of your import, so you can see what went wrong with any records that failed to import. The error messages are fairly straightforward (e.g., “Required fields are missing: Company”), and should help you fix your source data.
From what I’ve read, only the Enterprise and Unlimited Editions of Salesforce allow access to the “Bulk Data Load Jobs” page, which is where you can view the status of your job and download the results CSV. Just something to keep in mind if you are using Professional Edition or below.
One-Time Imports vs. Continuous Synchronization
A lot of the same considerations for a one-time data import should be taken into account with any continuous synchronizations you set up with existing systems, such as your website’s CMS or marketing automation platform. Make sure you know what data you want to bring in and where it should go before you start bringing live data into Salesforce.
Often when you’re first getting started with Salesforce, there’s a rush to get data into the system so you can start using it. Eagerness to start using Salesforce is great, but I hope this post has given you some reasons to take a moment to consider all the necessary factors before importing live data into your org.
Related Posts
-

If you’re a Salesforce administrator, one of your main concerns is data integrity. But for…
-
One of the biggest challenges we observe with clients implementing Salesforce (or any CRM) is…
-
When we work with our agency clients on their Salesforce implementations, what we often see…