If you’ve invested in Salesforce, you almost certainly want to take advantage of it by tracking your sales activity in Salesforce. Maybe this is something you’re approaching for the first time, or — and this is perhaps more likely — you tried at one point to use Salesforce for this purpose, and you’ve since begrudgingly given up.
The first step in preparing to use Salesforce for new business is getting to know and customizing the Opportunity object, as it’s the one you’ll likely be spending the most time with. Once you’ve customized your Opportunity object, you can begin to track your opportunities and your activity around those deals, and you’ll be able to build a killer dashboard to keep yourself on track. First, you’ll need to ask yourself a few questions and make a few adjustments.
Conversion
The first question you need to ask is: At what point does someone go from being a lead in Salesforce (see this post for more information about what a lead is) to being an opportunity? This is your conversion point.
Perhaps this is the moment that someone raises their hand and says, “Hey, I’ve got a potential engagement I’d like to speak with you about.” Or perhaps it’s after you speak with them, and you decide whether or not what you’ve discussed is potentially a good fit. There’s no one-size-fits-all answer to this question. Your conversion point depends on your specific sales process, and you can always change it in the future, depending on how the system is working for you. But you should decide on a typical conversion point to start with and be consistent about it.
Take for instance this sales process workflow that I drew up recently based on a conversation with a client. I started by asking him to walk me through his sales process. By talking through a typical sale, we were then able to suss out with where his conversion point should be with just a few minutes of discussion.
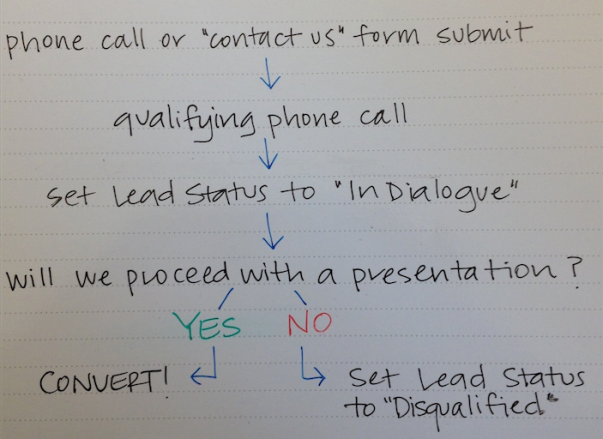
In the example above, this client will be working with the lead record for a bit, determining whether that lead should or shouldn’t be considered an opportunity based on an initial qualification call. I suggested using the Lead Status field to designate the people he’s vetting for opportunity status.
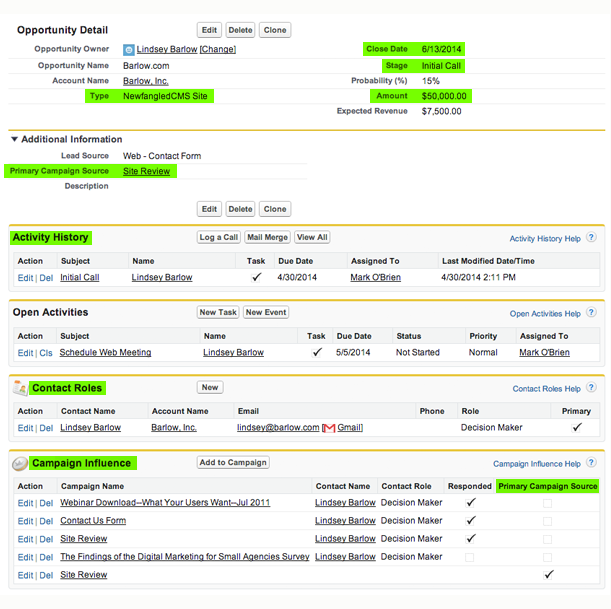
Once you’ve decided on your conversion point, you need to start thinking about some specific fields on the opportunity record and how to customize them to reflect your sales process.
Opportunity Stage
The first field to consider is Opportunity Stage. If customized correctly, this field will give you a ton of insight into what’s happening with a particular sale. You’ll know where this opportunity is in the sales process, what the probability of the sale is, and the next step in the process. And perhaps most importantly, you can use this field to create reports and dashboard components that will show you every active opportunity you’re working with, and what stage they’re in.
The stage field can be fairly unhelpful, however, if you don’t take the time to cater it to your specific process. Salesforce’s stage picklist comes filled with the following standard values:
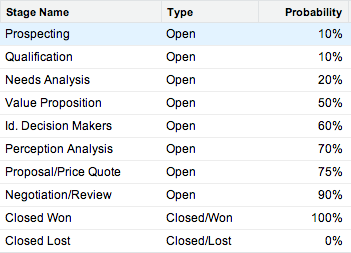
Are any of these values relevant to your sales process? Based on our experience with our clients, I’m willing to bet that a few might be somewhat relevant, most should be removed, and some new ones should be added.
Our own opportunity stage picklist has gone through a few iterations based on conversations between me and Mark. As recently as this month we updated these values to more specifically reflect Mark’s process.
Here’s what we had up until a few weeks ago:
We’d edited the default picklist a bit and added some custom values for certain closed designations, but we’d stuck mostly with the standard Salesforce open designations.
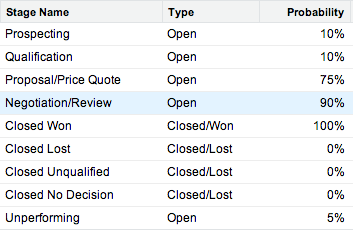
This is what our picklist looks like now, after our latest conversation:
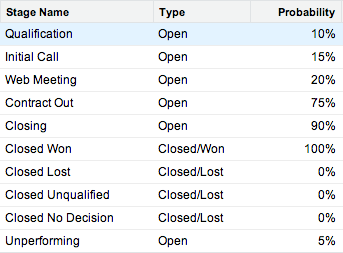
You can see that one standard Salesforce value remains, and that’s only because it’s a useful designation for Mark. The rest are all custom to his process.
While the first edits we made to the picklist were somewhat helpful, now he has even more insight into exactly where each active opportunity is in his sales process.
Opportunity Type
The second question we need to ask is “what do you sell?” Do you have multiple offerings or services that your customers are buying? Do you want to be able to report on what you’re selling most frequently, or what exactly a certain customer has purchased?
This is usually best tracked through the Opportunity Type picklist, which can also be updated to match your business model and sales process.
Salesforce’s standard values here are ‘New Business’ and ‘Existing Business.’ These designations might make sense if you only have one offering and are selling to both new customers and back into your existing customer base. But if you offer more than one service, you’re likely going to need to make some adjustments.
We decided to make our picklist more granular, and we also decided to make the Opportunity Type field required on our opportunities. We now have values like “NewfangledCMS Website” and “Salesforce Consulting.” An agency might choose to have values like “Brand Strategy,” “Marketing Consulting,” “Website Design,” etc. Again, this is something you should think about strategically and customize to fit your business.
Now that you have decided on your conversion point and edited your Stage and Type picklists to match your sales process, there are really only a few other important fields you need to remember to update.
Amount
This one’s simple. How much is this opportunity worth?
Close Date
Another simple one. When do you expect this deal to close?
Contact Roles
A Contact Role defines the part that a contact plays in a specific account or opportunity, so you should use contact roles to keep track of who you are working with on a particular deal. Often, the primary contact will be the lead who originally contacted you about the opportunity. However, you can add multiple contact roles to an opportunity and designate their relationship to that opportunity using the role picklist. Once again, you have the freedom to edit the contact role picklist as you choose. Customization FTW!
Primary Campaign Source
The last field I would recommend updating on your opportunity records is Primary Campaign Source. If you’re following our advice, you’re tracking all your higher-level marketing touchpoints using Salesforce’s campaign functionality. If you’re not using campaigns, my blog post next month will go into greater detail about them. You can also find some general information about campaigns in my post on Salesforce fundamentals. The point of doing this is so you can have some insight into how your marketing activities are driving sales and tie specific campaigns back to actual revenue.
The Primary Campaign Source field allows you to designate the most influential Campaign for your opportunity. This field will also attribute 100% of the revenue from your opportunity to the designated campaign, should you win that opportunity. If you don’t win the opportunity, the relationship will still be recorded on the campaign record so you can see how many opportunities in total (won or lost) were primarily influenced by that campaign. You can also designate multiple influential campaigns for an opportunity, although you can only set one as primary.
Other Fields
Those are all the really important standard fields to pay attention to on the opportunity record. There are other fields that come standard on the Opportunity object that you might find helpful to use, like Next Step or Description, but that’s up to you. You also might have other things you want to track, and in that case, the sky’s the limit. You have the ability to add any sort of custom field you want, if it makes sense for your process.
Your sales process should dictate what you add. Don’t go crazy with custom fields just because you can. Remember, someone (probably you) is going to be responsible for updating them, so be real about how much data entry you really want to do.
Always consider the value that a custom field is going to give you. If you’re going to use this field to pull reports or list views, then definitely go for it.
Activity Tracking
In addition to tracking information specific to each deal using the fields outlined above, you’ll also want to track your activity around those deals.
Using Salesforce’s Activity Tracking, you can log your calls and emails and set up tasks and reminders for yourself so you can keep yourself on target and make sure nothing slips through the cracks. You’ll be able to see your open tasks and events on your Salesforce homepage as soon as you log in.
There are also a number of third party apps that can help with activity tracking. We really like CirrusInsight and iHance Absolute Automation.
Pulling it all together with a Dashboard
The dashboard is where all the work you’ve done to customize your opportunity object, as well as your commitment to tracking your sales process in Salesforce, will pay off.
Here’s a screenshot of the Newfangled dashboard as it exists today. This is dummy data, obviously, but the components are the same.

From here, Mark can click on any of these opportunity names and be taken directly to that record. This is his homebase.
Every one of these components is pulling from a report which only uses the fields outlined above. There’s nothing fancy going on here. All the reports fueling this dashboard are simple summary reports, with a few filters set up to show us the data we want.
I hope I’ve shown you how simple it can be to track your sales in Salesforce. If you can align the system with your process and only worry about tracking the important stuff, then you’ll have so much more time for what’s really important: being proactive with your prospects and closing more deals!