One of the features I utilize the most in Salesforce is the ability to create list views. List views allow you to quickly apply a filter (or multiple filters) to an object and pull up a specific subset of records without having to build a report.
So, for example, in less than a minute I could use a list view to quickly see:
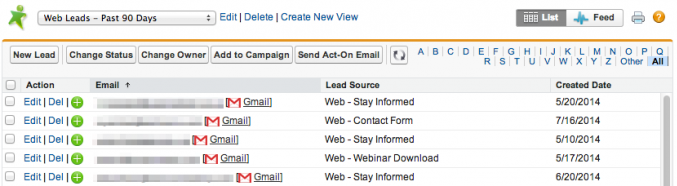
- All Leads added in the last 90 days with a lead source that contains ‘Web’ and without an email address provided by a free host (e.g., Gmail)
- All Accounts in the healthcare industry located in North Carolina
- All Contacts with a title containing ‘CMO,’ ‘owner,’ or ‘principal’
Here’s a quick rundown of how to create a list view, and some tips to get the most out of this feature. Let’s run through the first example listed above.
Getting Started
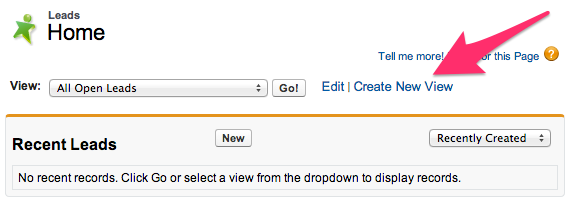
If you click on any object’s tab from the main navigation, you’re taken to that object’s homepage. As you can see below, I’ve navigated to the Leads homepage, where I will always, by default, see a list of leads I’ve recently viewed (as well as a few different tools and options below that we won’t get into).
Cool. But right now I really only want to see a subset of my Leads: those that came in through the website in the past 3 months, without a free email address.
You’ll find the option to create a new list view on the homepage, above your list of recently viewed records.
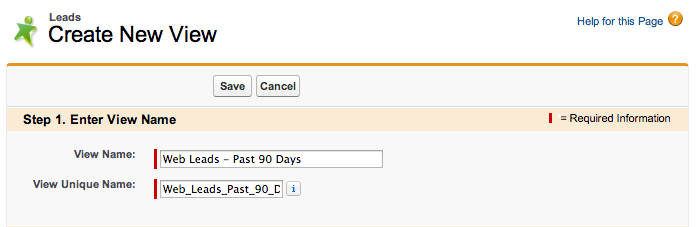
Step 1. Name your view
‘View Name’ is what you’ll see in the View dropdown once you’ve saved your new view. ‘View Unique Name’ is what the view name looks like to the Salesforce database. It’s generated automatically from what’s entered in ‘View Name.’
Step 2. Specify your filter criteria
In the ‘Filter By Owner’ section, you can choose to look at records based on ownership (your records, all records, and, in the case of Leads, those owned by a queue). The default is “all records.” You also have the option of choosing to filter based on campaign membership.

Now it’s time to start choosing Lead fields that are going to help us narrow down all our Lead records to just the ones we want to see.
First, choose your field.
We’re going to leverage ‘Lead Source,’ ‘Email’ and ‘Created Date.’
Second, choose your operator.
There are a lot of operators to choose from:
- equals
- not equal to
- starts with
- contains
- does not contain
- less than
- greater than
- less or equal
- greater or equal
- includes
- excludes
- within
We’re going to need ‘contains,’ ‘does not contain’ and ‘equals.’
Third, choose the values you want to filter by.
This is what the filters for our view look like:
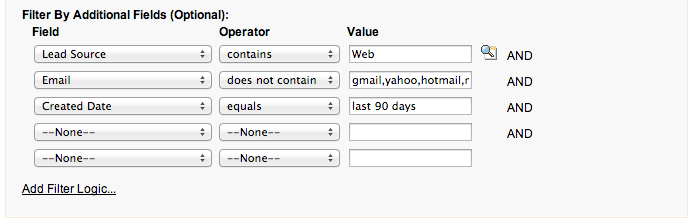
Filter 1: Since I know all my website lead sources start with the word ‘Web,’ I’ve set up my filter to say, “Show me all Leads that have a lead source value containing the word ‘web.’”
Filter 2: You can see I’m using commas to separate the different free email hosts that I want to ignore. The commas represent OR statements. I’m telling Salesforce that I want to see Leads with email addresses that do NOT contain ‘gmail’ OR ‘yahoo’ OR ‘hotmail.’
Filter 3: When you are filtering on a date field, you can use relative date values to specify the range. There are a number of relative date values that Salesforce makes available for list views and reports; see the list and read more about them here.
Any additional field filters that you add to your list view make it more restrictive. So my second field filter for ‘Email’ represents an AND statement. The records must meet the criteria for the first filter row (specific Lead Source values) AND the criteria for the second filter row (certain Email values).
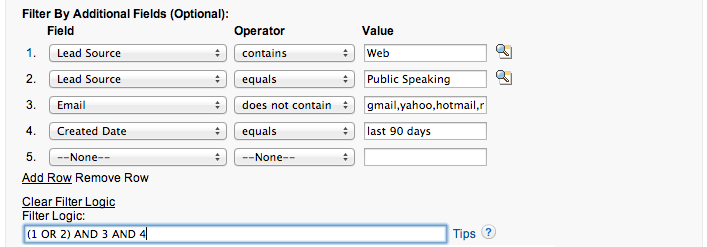
Salesforce allows you to change the filter logic of the rows. Perhaps you want to see records where either the lead source is from the website OR a conference AND they were all added within the past 90 days. Click ‘Add Filter Logic’ and get to work!
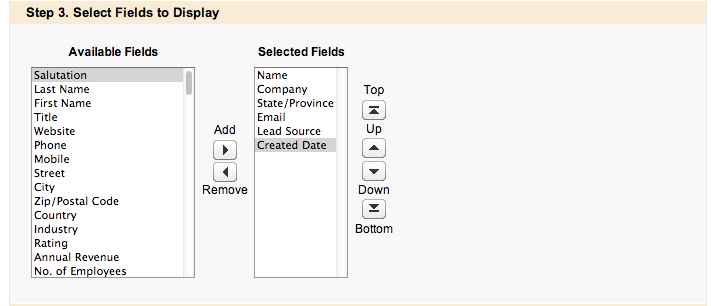
Step 4. Choose the fields to display in your list
Your list view is going to be pretty basic, like a clickable Excel spreadsheet. This is where you designate which columns you want to see in your spreadsheet. You can pick from a list of fields on the left, and add up to 10 of those to the list of selected fields on the right. It’s a good idea to include any fields you filtered on, so you can make sure you set up your filter criteria correctly.
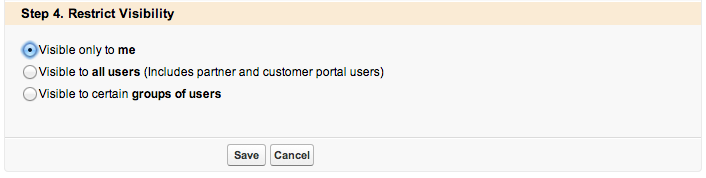
Step 5. Who gets to see your view?
Here you have the option of keeping your list view to yourself, or sharing it with other users. You’ll only have the option of sharing it if you have certain permissions in place.
Step 6. The view itself
Once you click ‘Save,’ you’ll be taken to your new view. There are a few different options available to change how your view looks. You can sort by different columns (ascending or descending) by clicking the column name once or twice. You can choose how many records to display on the page. If you are sorting on a column with text, an alphabet menu will appear at the top, and you can choose to display only records beginning with a certain letter.
What now?
So now you know how to create a list view. But why might you want to do so in the first place? There are myriad reasons. Perhaps you want to get a quick sense of just how many records fit a certain criteria. Maybe you’re doing a database cleanup project, and you need to know what you’re up against. Perhaps you need to drill down to a certain subset of people to make targeted contact. Maybe you’re working a certain list of leads, or need to pull a certain list of customers to follow up with.
You can also perform certain actions using list views. You can add records from a list view to a campaign, and many apps utilize list view functionality. With the Salesforce/Act-On integration, we have the option of sending an Act-On email from within a Salesforce list view.
List views are quick, easy and versatile! I hope this introduction has given you lots of ideas for utilizing them.
Related Posts
-
One of the biggest challenges we observe with clients implementing Salesforce (or any CRM) is…
-

If you’re a Salesforce administrator, one of your main concerns is data integrity. But for…
-
When we work with our agency clients on their Salesforce implementations, what we often see…